| | |
>
> | document.ondblclick=dblclick; //--> |
| |
TWiki Reference Manual (01-Sep-2001) |
| |
TWiki Variables
Special text strings expand on the fly to display dynamic content, such as user data or system info
TWikiVariables are text strings - %VARIABLE% or %VARIABLE{ parameter="value" }% - that expand into content whenever a topic is rendered for viewing. There are two types of variables:
- Preferences variables: Can be defined and changed by the user.
Example: %T% renders as 
- Predefined variables: Defined by the TWiki system or by extensions.
Example: %CALCULATE{}% is handled by the SpreadSheetPlugin
See list of all TWiki Variables currently defined in this TWiki installation.
TWiki Variables Wizard — to Find and Compose Variables
Pre-load image: 
<---->
<-- -->
Using Variables
To use a variable type its name. For example,
- type
%T% to get (a preferences variable)
- type
%TOPIC% to get TWikiVariables (a predefined variable)
- type
%CALCULATE{ "$UPPER(Text)" }% to get TEXT (a variable defined by a plugin)
Note:
- To leave a variable unexpanded, precede it with an exclamation point, e.g. type
!%TOPIC% to get %TOPIC%
- Variables are expanded relative to the topic they are used in, not the topic they are defined in
- Type
%ALLVARIABLES% to get a full listing of all variables defined for a particular topic
Variable Names
Variable names must start with a letter, optionally followed by letters, numbers and underscore '_' characters. Both upper-case and lower-case characters can be used, %MYVAR%, %MyVar%, %My2ndVar%, and %My_Var% are valid names. Variables are case sensitive, e.g. %MyVAR% and %MYVAR% are not the same.
By convention all settings, predefined variables and variables handled by extensions are always UPPER-CASE.
Preferences Variables
Unlike predefined variables, preferences variables can be defined by the user in various places.
Setting Preferences Variables
You can set variables in all the following places:
- system level in TWiki.TWikiPreferences
- plugin topics (see TWikiPlugins)
- local site level in Main.TWikiPreferences
- user level in individual user topics in Main web
- If UserSubwebs is in effect, the topic specified by
%USERPREFSTOPIC% in the user's subweb is read instead
- If
$TWiki::cfg{DemoteUserPreferences} is true, this step is deferred to a later step. On this TWiki installation, $TWiki::cfg{DemoteUserPreferences} is false
- web level in WebPreferences of each web
- If
EXTRAPREFERENCES is defined at this point, it's regarded as having comma separated list of topics. Those topics are read in the listed order as if they were WebPreferences
- topic level in topics in webs
- session variables (if sessions are enabled)
- user level preferences are set at this point if
$TWiki::cfg{DemoteUserPreferences} is true as mentioned at the step 4
Settings at higher-numbered levels override settings of the same variable at lower numbered levels, unless the variable was included in the setting of FINALPREFERENCES at a lower-numbered level, in which case it is locked at the value it has at that level.
If you are setting a variable and using it in the same topic, note that TWiki reads all the variable settings from the saved version of the topic before it displays anything. This means you can use a variable anywhere in the topic, even if you set it somewhere inconspicuous near the end. But beware: it also means that if you change the setting of a variable you are using in the same topic, preview will show the wrong thing, and you must save the topic to see it correctly.
The syntax for setting variables is the same anywhere in TWiki (on its own TWiki bullet line, including nested bullets):
[multiple of 3 spaces] * [space] Set [space] VARIABLENAME [space] = [space] value
Examples:
   * Set VARIABLENAME1 = value
      * Set VARIABLENAME2 = value
Spaces between the = sign and the value will be ignored. You can split a value over several lines by indenting following lines with spaces - as long as you don't try to use * as the first character on the following line.
Example:
   * Set VARIABLENAME = value starts here
     and continues here
Whatever you include in your variable will be expanded on display, exactly as if it had been entered directly.
Example: Create a custom logo variable
- To place a logo anywhere in a web by typing
%MYLOGO%, define the Variable on the web's WebPreferences topic, and upload a logo file, ex: mylogo.gif. You can upload by attaching the file to WebPreferences, or, to avoid clutter, to any other topic in the same web, e.g. LogoTopic. Sample variable setting in WebPreferences:
* Set MYLOGO = %PUBURL%/%WEB%/LogoTopic/mylogo.gif
You can also set preferences variables on a topic by clicking the link Edit topic preference settings under More topic actions. Use the same * Set VARIABLENAME = value syntax. Preferences set in this manner are not visible in the topic text, but take effect nevertheless.
Controlling User Level Preferences Override
By default, user level variables are set at the step 4 as stated in the previous section.
That means a user can finalise some preferences variables so that web level or topic level setting cannot override it.
This may result in a situation the web or page owner doesn't expect.
$TWiki::cfg{DemoteUserPreferences} has been introduced to avoid it.
If it's set to true, user level variables are set at the last step instead of the step 4.
But this is not enough.
To guarantee a certain result, you need to finalise critical preferences variables set at the web or topic level, which is cumbersome.
So preferences variables DENYUSERPREFEENCES and ALLOWUSERPREFEENCES have been introduced.
-
DENYUSERPREFEENCES and ALLOWUSERPREFEENCES may have comma separated list of variable names
- If a preferences variable is listed in
DENYUSERPREFEENCES, the variable cannot be overridden at the user level. There is a special value "all", which means no preferences variables can be overridden at the user level
- If
ALLOWUSERPREFEENCES is set and not empty, only the listed preferences variables can be overridden. There is a special value "all", which means any preferences variable can be overridden at the user level. But actually, "all" is not necessary since a blank value or not setting ALLOWUSERPREFEENCES has the same effect
-
DENYUSERPREFEENCES takes precedence over ALLOWUSERPREFEENCES. If a variable is listed on both, it cannot be overridden. If DENYUSERPREFEENCES is "all", the value of ALLOWUSERPREFEENCES doesn't matter.
For example, if you don't allow overriding at the user level at all:
* Set DENYUSERPREFERENCES = all
If you allow INYMCEPLUGIN_DISABLE and SKIN to be set at the user level:
* Set ALLOWUSERPREFERENCES = TINYMCEPLUGIN_DISABLE, SKIN
If you allow user preferences to set anything other than TINYMCEPLUGIN_DISABLE or SKIN:
* Set DENYUSERPREFERENCES = TINYMCEPLUGIN_DISABLE, SKIN
Please note DENYUSERPREFEENCES and ALLOWUSERPREFEENCES affect user preferences regardless of $TWiki::cfg{DemoteUserPreferences}.
You can set those variables at the site level while $TWiki::cfg{DemoteUserPreferences} setting to false.
If you do so, you should finalise DENYUSERPREFEENCES and ALLOWUSERPREFEENCES.
Otherwise, they might be overridden by user preferences.
You will get the most benefit of DENYUSERPREFEENCES and ALLOWUSERPREFEENCES by setting $TWiki::cfg{DemoteUserPreferences} to true.
That way, each web can specify how much user level preferences overriding is allowed.
Parameterized Variables (Macros)
It is possible to pass parameters to TWiki variables. This is called a macro in a programming language.
To define a parameterized variable, set a variable that contains other variables, such as:
   * Set EXAMPLE = Example variable using %DEFAULT%, %PARAM1% and %PARAM2%
   * Set DEMO = Demo using %DEFAULT{ default="(undefined)" }%,
                %PARAM1{ default="(undefined)" }% and %PARAM2{ default="(undefined)" }%
A special %DEFAULT% variable denotes the default (nameless) parameter of the calling variable. Variables optionally may list a default="..." parameter that gets used in case the calling variable does not specify that parameter.
To use a parameterized variable (or call a macro), add parameters within the curly brackets, such as:
   * %EXAMPLE{ "foo" PARAM1="bar" PARAM2="baz" }%
   * %DEMO{ "demo" PARAM2="parameter 2" }% -- note that PARAM1 is missing
which resolves to:
- %EXAMPLE{ "foo" PARAM1="bar" PARAM2="baz" }%
- %DEMO{ "demo" PARAM2="parameter 2" }% -- note that PARAM1 is missing
Parameters in the variable definition are expanded using the following sequence:
- Parameter from variable call. In above example,
%PARAM1% gets expanded to bar.
- Session variable and preferences settings
Example
Define variables:
   * Set DRINK = red wine
   * Set FAVORITE = My %DEFAULT{default="favorite"}% dish is %DISH{default="steak"}%,
                    my %DEFAULT{default="favorite"}% drink is %DRINK%.
The default can be defined with a default parameter (%DISH{default="steak"}%), or as a preferences setting (Set DRINK = ...).
Use Variables:
%FAVORITE{ DISH="Sushi" DRINK="Sake" }%
Returns:
%FAVORITE{ DISH="Sushi" DRINK="Sake" }%
%FAVORITE{}%
Returns:
%FAVORITE{}%
%FAVORITE{ "preferred" }%
Returns:
%FAVORITE{ "preferred" }%
<--
Redefine what is defined in INCLUDE:
- Set EXAMPLE = Example variable using favorite, (undefined) and (undefined)
- Set DEMO = Demo using favorite, (undefined) and (undefined)
- Set DRINK = red wine
- Set FAVORITE = My favorite dish is steak, my favorite drink is %DRINK%.
-->
Access Control Variables
These are special types of preferences variables to control access to content. TWikiAccessControl explains these security settings in detail.
Local values for variables
Certain topics (a users home topic, web site and default preferences topics) have a problem; variables defined in those topics can have two meanings. For example, consider a user topic. A user may want to use a double-height edit box when they are editing their home topic - but only when editing their home topic. The rest of the time, they want to have a normal edit box. This separation is achieved using Local in place of Set in the variable definition. For example, if the user sets the following in their home topic:
   * Set EDITBOXHEIGHT = 10
   * Local EDITBOXHEIGHT = 20
Then when they are editing any other topic, they will get a 10 high edit box. However when they are editing their home topic, they will get a 20 high edit box. Local can be used wherever a preference needs to take a different value depending on where the current operation is being performed.
Use this powerful feature with great care! %ALLVARIABLES% can be used to get a listing of the values of all variables in their evaluation order, so you can see variable scope if you get confused.
Frequently Used Preferences Variables
The following preferences variables are frequently used. They are defined in TWikiPreferences#Miscellaneous_Settings:
-
%BB% - line break and bullet combined
-
%BB2% - level 2 bullet with line break
-
%BB3% - level 3 bullet with line break
-
%BB4% - level 4 bullet with line break
-
%BR% - line break
-
%BULLET% - bullet sign
-
%CARET% - caret symbol
-
%VBAR% - vertical bar
-
%H% -  Help icon Help icon
-
%I% - Idea icon
-
%M% -  Moved to icon Moved to icon
-
%N% -  New icon New icon
-
%P% -  Refactor icon Refactor icon
-
%Q% - Question icon
-
%S% -  Pick icon Pick icon
-
%T% - Tip icon
-
%U% -  Updated icon Updated icon
-
%X% -  Alert icon Alert icon
-
%Y% -  Done icon Done icon
-
%RED% text %ENDCOLOR% - colored text (also %YELLOW%, %ORANGE%, %PINK%, %PURPLE%, %TEAL%, %NAVY%, %BLUE%, %AQUA%, %LIME%, %GREEN%, %OLIVE%, %MAROON%, %BROWN%, %BLACK%, %GRAY%, %SILVER%, %WHITE%)
-
%REDBG% text %ENDBG% - colored background (also %YELLOWBG%, %ORANGEBG%, %PINKBG%, %PURPLEBG%, %TEALBG%, %NAVYBG%, %BLUEBG%, %AQUABG%, %LIMEBG%, %GREENBG%, %OLIVEBG%, %MAROONBG%, %BROWNBG%, %BLACKBG%, %GRAYBG%, %SILVERBG%, %WHITEBG%)
There are additional useful preferences variables defined in TWikiPreferences, in Main.TWikiPreferences, and in WebPreferences of every web.
Predefined Variables
Most predefined variables return values that were either set in the configuration when TWiki was installed, or taken from server info (such as current username, or date and time). Some, like %SEARCH%, are powerful and general tools.
- Show all TWiki Variables
- Predefined variables can be overridden by preferences variables (except a few such as TOPIC and WEB)
- Extensions may extend the set of predefined variables (see individual extension topics for details)
- Take the time to thoroughly read through ALL preference variables. If you actively configure your site, review variables periodically. They cover a wide range of functions, and it can be easy to miss the one perfect variable for something you have in mind. For example, see
%INCLUDINGTOPIC%, %INCLUDE%, and the mighty %SEARCH%.
Search or List Variables by Category
All TWiki Variables:
ACTIVATEDPLUGINS, ADDTOHEAD, ALLVARIABLES, AQUA, ATTACHURL, ATTACHURLPATH, AUTHREALM, BASETOPIC, BASEWEB, BB, BB2, BB3, BB4, BLACK, BLUE, BR, BROWN, BUBBLESIG, BULLET, CALC, CALCULATE, CARET, CHILDREN, COLORPICKER, COMMENT, CONTENTMODE, COPY, DASHBOARD, DATE, DATEPICKER, DISPLAYTIME, DISPLAYTIME2, EDITACTION, EDITFORMFIELD, EDITTABLE, ENCODE, ENDBG, ENDCOLOR, ENDCOLUMNS, ENDSECTION, ENTITY, ENV, EXAMPLEVAR, FAILEDPLUGINS, FORMFIELD, FOURCOLUMNS, GET, GMTIME, GMTIME2, GRAY, GREEN, GROUPS, H, HEADLINES, HIDE, HIDEINPRINT, HOMETOPIC, HTTP, HTTPHOST, HTTPS, I, ICON, ICONURL, ICONURLPATH, IF, INCLUDE, INCLUDINGTOPIC, INCLUDINGWEB, JQENDTAB, JQENDTABPANE, JQTAB, JQTABPANE, LANGUAGE, LANGUAGES, LAQUO, LIME, LOCALSITEPREFS, LOGIN, LOGINURL, LOGOUT, LOGOUTURL, M, MAINWEB, MAKETEXT, MAROON, MDREPO, META, METASEARCH, N, NAVY, NBSP, NOP, NOTIFYTOPIC, OLIVE, ORANGE, P, PARENTBC, PARENTTOPIC, PINK, PLUGINDESCRIPTIONS, PLUGINVERSION, PUBURL, PUBURLPATH, PURPLE, Q, QUERYPARAMS, QUERYSTRING, RAQUO, RED, REDBG, REG, REMOTEADDR, REMOTEPORT, REMOTEUSER, RENDERLIST, REVINFO, REVINFO2, S, SCRIPTNAME, SCRIPTSUFFIX, SCRIPTURL, SCRIPTURL2, SCRIPTURLPATH, SCRIPTURLPATH2, SEARCH, SERVERTIME, SERVERTIME2, SESSIONID, SESSIONVAR, SESSIONVARIABLE, SET, SETGETDUMP, SILVER, SITENAME, SITESTATISTICSTOPIC, SLIDESHOWEND, SLIDESHOWSTART, SPACEDTOPIC, SPACEOUT, STARTINCLUDE, STARTSECTION, STATISTICSTOPIC, STOPINCLUDE, SYSTEMWEB, T, TABLE, TEAL, THREECOLUMNS, TM, TOC, TOC2, TOPIC, TOPICLIST, TOPICTITLE, TOPICURL, TWIKIWEB, TWISTY, TWOCOLUMNS, U, URLPARAM, USERINFO, USERNAME, USERREPORT, USERSIG, USERSWEB, VAR, VBAR, WEB, WEBLIST, WEBPREFSTOPIC, WHITE, WIKIHOMEURL, WIKILOGOALT, WIKILOGOIMG, WIKILOGOURL, WIKINAME, WIKIPREFSTOPIC, WIKITOOLNAME, WIKIUSERNAME, WIKIUSERSTOPIC, WIKIVERSION, WIP, X, Y, YELLOW, total 185 variables
Documenting TWiki Variables
This section is for people documenting TWiki variables of the TWiki core and TWiki extensions.
Each variable is documented in a topic named Var<name> in the TWiki web. For example, a %LIGHTSABER% variable has a documentation topic called VarLIGHTSABER. The topic is expected to have a specific format so that reports in this TWikiVariables topic, in TWikiVariablesSearch and in category topics work as expected.
Basic structure of a variable documentation topic:
- Parent set to TWikiVariables
- An anchor named the same like the topic, such as
#VarLIGHTSABER
- A
---+++ (level 3) heading with variable name, --, short description
- A bullet with description of the variable (optional)
- A
Syntax: bullet with example syntax
- A
Parameters: bullet with a table explaining the parameters (optional)
- An
Example: bullet or two with examples
- An
Expands to: bullet with expanded variable (optional)
- A
Note: bullet with notes (optional)
- A
Category: bullet with one or more of the TWiki variables categories:
AdministrationVariables, ApplicationsAndComponentsVariables, AttachmentsAndFilesVariables, ChartingAndDrawingVariables, DatabaseAndFormsVariables, DateAndTimeVariables, DevelopmentVariables, EditingAndContentUpdateVariables, EmailAndNotificationVariables, ExportAndPublishingVariables, FormattingAndRenderingVariables, ImportVariables, LinkingAndNavigationVariables, SearchingAndListingVariables, SecurityAndAccessControlVariables, SkinsAndTemplatesVariables, SystemInformationVariables, TablesAndSpreadsheetsVariables, UIAndVisualizationVariables, UsersAndAuthenticationVariables, WorkflowAndAutomationVariables
- A
Related: bullet with related links. Links have conditional IF so that links work properly locally in variable documentation topics and in the TWikiVariables topic
Example content of a VarLIGHTSABER topic:
#VarLIGHTSABER
---+++ LIGHTSABER -- laser sword to fend of unethical competition
   * The =%<nop>LIGHTSABER{}%= variable is handled by the LightsaberPlugin.
   * Syntax: =%<nop>LIGHTSABER{ _parameters_ }%=
   * Parameters:
     | *Parameter* | *Description* | *Default* |
     | =color="..."= | Color: =red=, =glue=, =green= | =white= |
     | =sound="..."= | Sound: =none=, =standard=, =loud= | =none= |
   * Example: =%<nop>LIGHTSABER{ color="red" }%= shows a red Lightsaber
   * Expands to: =%LIGHTSABER{ color="red" }%=
   * Note: The Lightsaber is a fictional weapon in the Star Wars universe, a "laser sword."
   * Category: FormattingAndRenderingVariables, UIAndVisualizationVariables
   * Related: [[%IF{"'%INCLUDINGTOPIC%'='TWikiVariables'" then="#"}%VarPLASMA][PLASMA]], LightsaberPlugin
|
|
<
< |
TWiki Meta Data
Additional topic data, program-generated or from TWikiForms, is stored embedded in the topic text using META: tags
Overview
By default, TWiki stores topics in files on disk, in a really simple and obvious directory structure. The big advantage of this approach is that it makes it really easy to manipulate topics from outside TWiki, and is also very safe; there are no complex binary indexes to maintain, and moving a topic from one TWiki to another is as simple as copying a couple of text files.
To keep everything together in one place, TWiki uses a simple method for embedding additional data (program-generated or from TWikiForms) in topics. It does this using META: tags.
META: data includes program-generated info like FileAttachment and topic movement data, and user-defined TWikiForms info.
Meta Data Syntax
- Format is the same as in TWikiVariables, except all fields have a key.
-
%META:<type>{key1="value1" key2="value2" ...}%
- Order of fields within the meta variables is not defined, except that if there is a field with key
name, this appears first for easier searching (note the order of the variables themselves is defined).
- Each meta variable is on one line.
- Values in meta-data are URL encoded so that characters such as \n can be stored.
Example of Format
%META:TOPICINFO{version="1.6" date="976762663" author="LastEditorWikiName" format="1.0"}%
   text of the topic
%META:TOPICMOVED{from="Codev.OldName" to="Codev.NewName"
   by="TopicMoverWikiName" date="976762680"}%
%META:TOPICPARENT{name="NavigationByTopicContext"}%
%META:FILEATTACHMENT{name="Sample.txt" version="1.3" ... }%
%META:FILEATTACHMENT{name="Smile.gif" version="1.1" ... }%
%META:FORM{name="WebFormTemplate"}%
%META:FIELD{name="OperatingSystem" value="OsWin"}%
%META:FIELD{name="TopicClassification" value="PublicFAQ"}%
Meta Data Specifications
The current version of Meta Data is 1.0, with support for the following variables.
META:TOPICINFO
| Key |
Comment |
| version |
Same as RCS version |
| date |
integer, unix time, seconds since start 1970 |
| author |
last to change topic, is the REMOTE_USER |
| format |
Format of this topic, will be used for automatic format conversion |
META:TOPICMOVED
This is optional, exists if topic has ever been moved. If a topic is moved more than once, only the most recent META:TOPICMOVED meta variable exists in the topic, older ones are to be found in the rcs history.
%META:TOPICMOVED{from="Codev.OldName" to="Codev.NewName" by="talintj" date="976762680"}%
| Key |
Comment |
| from |
Full name, i.e., web.topic |
| to |
Full name, i.e., web.topic |
| by |
Who did it, is the REMOTE_USER, not WikiName |
| date |
integer, unix time, seconds since start 1970 |
Notes:
- at present version number is not supported directly, it can be inferred from the RCS history.
- there is only one META:TOPICMOVED in a topic, older move information can be found in the RCS history.
META:TOPICPARENT
| Key |
Comment |
| name |
The topic from which this was created, typically when clicking on a red-link, or by filling out a form. Normally just TopicName, but it can be a full Web.TopicName format if the parent is in a different Web. |
META:FILEATTACHMENT
| Key |
Comment |
| name |
Name of file, no path. Must be unique within topic |
| version |
Same as RCS revision |
| path |
Full path file was loaded from |
| size |
In bytes |
| date |
integer, unix time, seconds since start 1970 |
| user |
the REMOTE_USER, not WikiName |
| comment |
As supplied when file uploaded |
| attr |
h if hidden, optional |
Extra fields that are added if an attachment is moved:
| Key |
Comment |
| movedfrom |
full topic name - web.topic |
| movedby |
the REMOTE_USER, not WikiName |
| movedto |
full topic name - web.topic |
| moveddate |
integer, unix time, seconds since start 1970 |
META:FORM
| Key |
Comment |
| name |
A topic name - the topic represents one of the TWikiForms. Can optionally include the web name (i.e., web.topic), but doesn't normally |
META:FIELD
Should only be present if there is a META:FORM entry. Note that this data is used when viewing a topic, the form template definition is not read.
| Key |
Name |
| name |
Ties to entry in TWikiForms template, is title with all bar alphanumerics and . removed |
| title |
Full text from TWikiForms template |
| value |
Value user has supplied via form |
Recommended Sequence
There is no absolute need for Meta Data variables to be listed in a specific order within a topic, but it makes sense to do so a couple of good reasons:
- form fields remain in the order they are defined
- the
diff function output appears in a logical order
The recommended sequence is:
-
META:TOPICINFO
-
META:TOPICPARENT (optional)
- text of topic
-
META:TOPICMOVED (optional)
-
META:FILEATTACHMENT (0 or more entries)
-
META:FORM (optional)
-
META:FIELD (0 or more entries; FORM required)
Viewing Meta Data in Page Source
When viewing a topic the Raw Text link can be clicked to show the text of a topic (i.e., as seen when editing). This is done by adding raw=on to URL. raw=debug shows the meta data as well as the topic data, ex: debug view for this topic
Rendering Meta Data
Meta Data is rendered with the %META% variable. This is mostly used in the view, preview and edit scripts.
You can render form fields in topic text by using the FORMFIELD variable. Example:
%FORMFIELD{"TopicClassification"}%
For details, see VarFORMFIELD.
Current support covers:
| Variable usage: |
Comment: |
%META{"form"}% |
Show form data, see TWikiForms. |
%META{"formfield"}% |
Show form field value. Parameter: name="field_name". Example:
%META{ "formfield" name="TopicClassification" }% |
%META{"attachments"}% |
Show attachments, except for hidden ones. Options:
all="on": Show all attachments, including hidden ones. |
%META{"moved"}% |
Details of any topic moves. |
%META{"parent"}% |
Show topic parent. Options:
dontrecurse="on": By default recurses up tree, at some cost.
nowebhome="on": Suppress WebHome.
prefix="...": Prefix for parents, only if there are parents, default "".
suffix="...": Suffix, only appears if there are parents, default "".
separator="...": Separator between parents, default is " > ". |
Note: SEARCH can also be used to render meta data, see examples in FormattedSearch and SearchPatternCookbook.
Related Topics: DeveloperDocumentationCategory, UserDocumentationCategory |
| |
TWiki Forms - Foundation of TWiki Applications
Add structure to content with forms attached to twiki topics. TWiki forms (with form fields) and formatted search are the base for building database applications.
Overview
By adding form-based input to free form content, you can structure topics with unlimited, easily searchable categories. A form is enabled for a web and can be added to a topic. The form data is shown in tabular format when the topic is viewed, and can be changed in edit mode using edit fields, radio buttons, check boxes and list boxes. Many different form types can be defined in a web, though a topic can only have one form attached to it at a time.
Typical steps to build an application based on TWiki forms:
- Define a form template
- Enable the form for a web
- Add the form to a template topic
- Build an HTML form to create new topics based on that template topic
- Build a FormattedSearch to list topics that share the same form
Tip: The blog How to Create a TWiki Application on TWiki.org is a good tutorial to get started with TWiki forms based applications. on TWiki.org is a good tutorial to get started with TWiki forms based applications.
Defining a Form
A Form Template specifies the fields in a form. A Form Template is simply a page containing a TWiki table, where each row of the table specifies one form field.
- Create a new topic with your form name:
YourForm, ExpenseReportForm, InfoCategoryForm, RecordReviewForm, whatever you need.
The name of a Form Template topic must end in Form.
- Create a TWiki table, with each column representing one element of an entry field:
Name, Type, Size, Values, Tooltip message, and Attributes (see sample below).
- For each field, fill in a new line; for the type of field, select from the list.
- Save the topic
Example:
| *Name* | *Type* | *Size* | *Values* | *Tooltip message* | *Attributes* |
| TopicClassification | select | 1 | NoDisclosure, PublicSupported, PublicFAQ | blah blah... | |
| OperatingSystem | checkbox | 3 | OsHPUX, OsLinux, OsSolaris, OsWin | blah blah... | |
| OsVersion | text | 16 | | blah blah... | |
See structure of a form for full details of what types are available and what all the columns mean.
You can also retrieve possible values for select, checkbox or radio types from other topics:
Example:
- In the WebForm topic, define the form:
Leave the Values field blank.
- Then in the TopicClassification topic, define the possible values:
| *Name* |
| NoDisclosure |
| Public Supported |
| Public FAQ |
| Name | | NoDisclosure | | Public Supported | | Public FAQ |
Field values can also be set using the result of expanding other TWiki variables. For example,
%SEARCH{"Office$" scope="topic" web="%USERSWEB%" nonoise="on" type="regex" format="$web.$topic" separator=", " }%
When used in the value field of the form definition, this will find all topic names in the Main web which end in "Office" and use them as the legal field values.
Adding a Form to a Topic
- To add a Form, follow the "More topic actions" link at the bottom of a topic, select "Add or Replace Form".
- Select a Form Template topic. These are topics with names ending in Form that contain a Form Template table.
- A Form is typically added to a template topic, either to the
WebTopicEditTemplate topic in a web, or a new topic that serves as an application specific template topic.
- Modify the template topic to set the initial Form values.
- Note: Initial values will not be set in the form of a new topic if you only use the formtemplate parameter.
Changing a Form
- To change a Form, follow the "More topic actions" link at the bottom of a topic, select "Add or Replace Form", and select a new Form.
- You can change a form definition, and TWiki will try to make sure you don't lose any data from the topics that use that form.
- If you add a new field to the form, then it will appear next time you edit a topic that uses the form.
- If you delete a field from the form, or change a field name, then the data will not be visible when you edit the topic (the changed form definition will be used). If you save the topic, the old data will be lost (though thanks to revision control, you can always see it in older versions of the topic)
- If two people edit the same topic containing a form at exactly the same time, and both change fields in the form, TWiki will try to merge the changes so that no data is lost.
Structure of a Form Template
A Form Template specifies the fields in a form. A Form Template is simply a page containing a TWiki table, where each row of the table specifies one form field.
Each row of the table defines one element of an input field:
| Name |
Type |
Size |
Values |
Tooltip message |
Attributes |
The Name, Type and Size columns are required. Other columns are optional. The form template must have a header row, e.g. at least | *Name* | *Type* | *Size* | is required. Columns:
- Name column:
Name is the name of the form field.
- Type, Size, Value columns:
Type, Size and Value describe the type, size and initial value of this form field. Type text, checkbox, select and more are described in the Form Field Types section below.
- Tooltip message column: The
Tooltip message will be displayed when the cursor is hovered over the field in edit view.
- Attributes column:
Attributes may contain additional key="value" form field attributes, separated by space.
- A
hidden="1" attribute indicates that this field is hidden, e.g. not shown in view mode. However, the field is available for editing and storing information. The deprecated H attribute has the same function, it is still supported but might be removed in a future TWiki release.
Tip: The TWiki form header is suppressed in view mode if all fields of the form are hidden. For better usability it is good to hide the whole form if the display and interaction of all form fields is done externally. For example, the display and modification of form field values can be done in a header topic that is included in each page.
- An
mandatory="1" attribute indicates that this field is mandatory. The topic cannot be saved unless a value is provided for this field. If the field is found empty during topic save, an error is raised and the user is redirected to an oops page. Mandatory fields are indicated by an asterisks next to the field name. The deprecated M attribute has the same function, it is still supported but might be removed in a future TWiki release.
- Additional form field type specific attributes can be used, such as
onfocus="..." and spellcheck="..".
For example, a simple form just supporting entry of a name and a date would look as follows:
| *Name* | *Type* | *Size* |
| Name   | text   | 80     |
| Date   | date   | 30     |
Field Name Notes:
- Field names have to be unique.
- A very few field names are reserved. If you try to use one of these names, TWiki will automatically append an underscore to the name when the form is used.
- You can space out the title of the field, and it will still find the topic e.g.
Aeroplane Manufacturers is equivalent to AeroplaneManufacturers.
- If a
label field has no name, it will not be shown when the form is viewed, only when it is edited.
- Field names can in theory include any text, but you should stick to alphanumeric characters. If you want to use a non-wikiname for a
select, checkbox or radio field, and want to get the values from another topic, you can use [[...]] links. This notation can also be used when referencing another topic to obtain field values, but a name other than the topic name is required as the name of the field.
- Leading and trailing spaces are not significant.
Field Value Notes:
- The field value will be used to initialize a field when a form is created, unless specific values are given by the topic template or query parameters. The first item in the list for a select or radio type is the default item. For
label, text, and textarea fields the value may also contain commas. checkbox fields cannot be initialized through the form template.
- Leading and trailing spaces are not significant.
- Field values can also be generated through a FormattedSearch, which must yield a suitable table as the result.
- Variables in the initial values of a form definition get expanded when the form definition is loaded.
- If you want to use a
| character in the initial values field, you have to precede it with a backslash, thus: \|.
- You can use
<nop> to prevent TWiki variables from being expanded.
- The FormatTokens can be used to prevent expansion of other characters.
General Notes:
- The topic definition is not read when a topic is viewed.
- Form definition topics can be protected in the usual manner, using TWikiAccessControl, to limit who can change the form template and/or individual value lists. Note that view access is required to be able to edit topics that use the form definition, though view access to the form definition is not required to view a topic where the form has been used.
Form Field Types
Each table row of a form template defines one element of an input field:
| Name |
Type |
Size |
Values |
Tooltip message |
Attributes |
Many types of form fields are available. Some are TWiki internal, some are provided by extensions. Find more TWiki form field extensions on TWiki.org. The Size, Value and Attributes depend on the Type used. Form field types:
| Type |
Description |
Size |
Value |
text |
One-line text field |
Text box width in number of characters |
Initial (default) content |
textarea |
Multi-line text box |
Columns x rows, such as 80x6; default is 40x5 |
Initial (default) content |
label |
Read-only text label |
|
Text of the label |
checkbox |
One or more checkboxes that can be toggled individually |
Number of checkboxes shown per line |
Comma-space-separated list of item labels - can be a dynamic SEARCH |
checkbox+buttons |
Like checkbox, adding [Set] and [Clear] buttons |
radio |
Radio buttons, mutually exclusive; only one can be selected |
Number of radio buttons shown per line |
Comma-space-separated list of item labels - can be a dynamic SEARCH |
combobox |
 Text field & select combination box, rendered as a text input field and a button to open up a selector box Text field & select combination box, rendered as a text input field and a button to open up a selector box |
Text box width in number of characters |
Comma-space-separated list of options of the select box - can be a dynamic SEARCH |
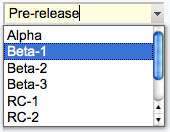
select |
Select box, rendered as a picklist or a multi-row selector box depending on the size value |
• 1: Show a picklist
• Number > 1: Multi-row selector box of specified size
• Range e.g. 3..10: Multi-row selector box with variable size - the box will never be smaller than 3 items, never larger than 10, and will be 5 high if there are only 5 options |
Comma-space-separated list of options of the select box - can be a dynamic SEARCH |
select+multi |
Like select, turning multi-select on, to allow Shift+Click and Ctrl+Click to select (or deselect) multiple items |
select+values |
Like select, allowing definition of values that are different to the displayed text. An option is defined as value: title, where the value is the value passed on form submit, and title is the option text shown to the user. For example:
| Field 9 | select+values | 3 | One, 2: Two, III: Three | Various values formats |
shows but the values of options Two and Three are 2 and III, respectively. A legacy title=value syntax is supported as well, for example: One, Two=2, Three=III. |
select+multi+values |
Combination of select+multi and select+values |
color |
 Single-line text box and a color picker to pick a color. The color can also be typed into the text box, such as Single-line text box and a color picker to pick a color. The color can also be typed into the text box, such as #123456.
An attribute of type="popup" shows a button that, when clicked, opens a color picker popup. |
Text box width in number of characters |
Initial (default) color |
date |
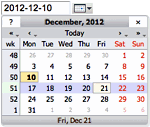 Text input field and a button next to it to pick a date from a pop-up calendar. The date can also be typed into the text box. Text input field and a button next to it to pick a date from a pop-up calendar. The date can also be typed into the text box. |
Text box width in number of characters |
Initial (default) date |
Note on Attributes:
- Common attributes: hidden, mandatory, class, form, onblur, onfocus, onchange, onselect, onmouseover, onmouseout, spellcheck, style, tabindex, title, translate
- Type-specific attributes:
-
text type: id, max, maxlength, min, pattern, placeholder
-
textarea type: autocomplete, id, maxlength, minlength, pattern, placeholder, wrap
-
label type: id, max, maxlength, min
-
combobox type: max, maxlength, min, pattern, placeholder
Values in Other Topics
As described above, you can also retrieve possible values for select, checkbox or radio types from other topics. For example, if you have a rows defined like this:
| *Name*                 | *Type* | *Size* |
| AeroplaneManufacturers | select |        |
the TWiki will look for the topic AeroplaneManufacturers to get the possible values for the select.
The AeroplaneManufacturers topic must contain a table, where each row of the table describes a possible value. The table only requires one column, Name. Other columns may be present, but are ignored.
For example:
| *Name* |
| Routan |
| Focke-Wulf |
| De Havilland |
Notes:
- The
Values column must be empty in the referring form definition.
Using a form template on a different web
You can use a form template on a different web by specifying a form template in the WEB.TOPIC format.
In addition, you can put a comma separated list of webs in the TWIKIFORMPATH variable.
It's referred to only when a form template is spcified without a web (TOPIC instead of WEB.TOPIC).
The webs in TWIKIFORMPATH are examined in the listed order until the specified template is found.
TWIKIFORMPATH may contain TWiki variables. For example:
* Set TWIKIFORMPATH = %APPLICATION_WEB%, %WEB%
If TWIKIFORMPATH is defined, the current web is examined only if all the webs listed in it don't have the form template.
Extending the range of form data types
You can extend the range of data types accepted by forms by using TWikiPlugins. All such extended data types are single-valued (can only have one value) with the following exceptions:
- any type name starting with
checkbox
- any type name with
+multi anywhere in the name
Types with names like this can both take multiple values.
Hints and Tips
Editing Just Form Data, Without Topic Text
In some cases you want to change only the form data. You have the option of hiding the topic text with two methods:
- To display only the form whenever you edit a topic, set the preference variable EDITACTION to value
form (see details).
- To change the edit action in a URL, add a
action=form parameter to the edit URL string, such as
%SCRIPTURL{edit}%/%BASEWEB%/%BASETOPIC%?t=%SERVERTIME{$epoch}%;action=form (see details).
Build an HTML Form to Create New Form-based Topics
New topics with a form are created by simple HTML forms asking for a topic name. For example, you can have a SubmitExpenseReport topic where you can create new expense reports, a SubmitVacationRequest topic, and so on. These can specify the required template topic with its associated form. Template topics has more.
A Form Template specifies the fields in a form. A Form Template is simply a page containing a TWiki table, where each row of the table specifies one form field.
Update Specific Form Fields
All the form fields are shown and can be updated when editing a topic that has a form. It is possible to have more control over the layout of a form, or update just a subset of the form fields by using a custom HTML form. For example, in a bug tracker, each topic would include a header topic that shows a form with some fields to update specific form fields of the bug item. Use the EDITFORMFIELD variable to easily create this form in the header topic. Example:
%EDITFORMFIELD{ "form" type="start" action="save" topic="%BASETOPIC%" }%
| Priority: | %EDITFORMFIELD{ "Priority" topic="%BASETOPIC%" }% |
| Status:   | %EDITFORMFIELD{ "Status"   topic="%BASETOPIC%" }% |
|  | %EDITFORMFIELD{ "form" type="submit" value="Update" }% |
%EDITFORMFIELD{ "LastUpdate" type="hidden" value="%SERVERTIME{$year-$mo-$day}%" }%
%EDITFORMFIELD{ "form" type="end" }%
Assuming the base topic has a BugForm with Priority and Status fields of type select, a LastUpdate field of type text, and some other fields. Above form shows a table with selectors for Priority and Status, and an Update button. On form submit, the Priority, Status and LastUpdate fields are updated in the base topic.
Searching for Form Data
TWiki Forms accept user-input data, stored as TWikiMetaData. Meta data also contains program-generated info about changes, attachments, etc. To find, format and display form and other meta data, see TWikiMetaData, EDITFORMFIELD, FORMFIELD, SEARCH and METASEARCH variables in TWikiVariables, and TWiki Formatted Search.
Example
TWiki users often want to have an overview of topics they contributed to. With the $formfield parameter it is easy to display the value of a classification field next to the topic link:
| *Topic* | *Classification* |
%SEARCH{"%USERSWEB%.UserName" scope="text" nosearch="on" nototal="on" sort="modified" reverse="on"
format="|<b>[[$web.$topic][$topic]]</b> |<nop>$formfield(TopicClassification) |" web="Sandbox"}%
Searching forms this way is obviously pretty inefficient, but it's easy to do. If you want better performance, take a look at some of the structured wiki extensions that support higher performance searching e.g. TWiki:Plugins.DBCachePlugin.
Gotcha!
- Some browsers may strip linefeeds from
text fields when a topic is saved. If you need linefeeds in a field, make sure it is a textarea.
|
| |
Warning: Can't find topic TWiki.MonitoringSiteActivity
|
|
>
> |
File Attachments
Each topic can have one or more files of any type attached to it by using the Attach screen to upload (or download) files from your local PC. Attachments are stored under revision control: uploads are automatically backed up; all previous versions of a modified file can be retrieved.
What Are Attachments Good For?
File Attachments can be used to archive data, or to create powerful customized groupware solutions, like file sharing and document management systems, and quick Web page authoring.
Document Management System
- You can use Attachments to store and retrieve documents (in any format, with associated graphics, and other media files); attach documents to specific TWiki topics; collaborate on documents with full revision control; distribute documents on a need-to-know basis using web and topic-level access control; create a central reference library that's easy to share with an user group spread around the world.
File Sharing
- For file sharing, FileAttachments on a series of topics can be used to quickly create a well-documented, categorized digital download center for all types of files: documents; graphics and other media; drivers and patches; applications; anything you can safely upload!
Web Authoring
- Through your Web browser, you can easily upload graphics (or sound files, or anything else you want to link to on a page) and place them on a single page, or use them across a web, or site-wide.
- NOTE: You can also add graphics - any files - directly, typically by FTP upload. This requires FTP access, and may be more convenient if you have a large number of files to load. FTP-ed files can't be managed using browser-based Attachment controls. You can use your browser to create TWikiVariables shortcuts, like this %H% = .
Uploading Files
- Click on the
Attach link at the bottom of the page. The Attach screen lets you browse for a file, add a comment, and upload it. The uploaded file will show up in the File Attachment table.
- NOTE: The topic must already exist. It is a two step process if you want to attach a file to a non-existing topic; first create the topic, then add the file attachment.
- TWiki is capable of getting up to 10 files per upload session. Whether you can actually upload multiple files in one go from web user interface depends on skin.
- Any type of file can be uploaded. Some files that might pose a security risk are renamed, ex:
*.php files are renamed to *.php.txt so that no one can place code that would be read in a .php file.
- The previous upload path is retained for convenience. In case you make some changes to the local file and want to upload it, again you can copy the previous upload path into the Local file field.
- TWiki can limit the file size. This is defined by the
%ATTACHFILESIZELIMIT% variable of the TWikiPreferences, currently set at 100000 KB.
- It's not recommended to upload files greater than a few hundred K through a browser. Large files can be extremely slow-loading, and often time out. Use an FTP site for large file uploads.
- Automatic attachments:
- When enabled, all files in a topic's attachment directory are shown as attachments to the topic - even if they were directly copied to the directory and never attached by using an 'Attach' link. This is a convenient way to quickly "attach" files to a topic without uploading them one by one; although at the cost of losing audit trail and version control.
- To enable this feature, set the {AutoAttachPubFiles} configuration option.
- NOTE: The automatic attachment feature can only be used by an administrator who has access to the server's file system.
Downloading Files
- NOTE: There is no access control on individual attachments. If you need control over single files, create a separate topic per file and set topic-level access restrictions for each.
Moving Attachment Files
An attachment can be moved between topics.
- Click
Manage on the Attachment to be moved.
- On the control screen, select the new web and/or topic.
- Click
Move. The attachment and its version history are moved. The original location is stored as topic Meta Data.
Deleting Attachments
Move unwanted Attachments to web Trash, topic TrashAttachment.
Linking to Attached Files
- Once a file is attached it can be referenced in the topic. Example:
-
Attach file: Sample.txt
-
Edit topic and enter: %ATTACHURL%/Sample.txt
-
Preview: %ATTACHURL%/Sample.txt text appears as: /twiki/pub/TWiki/FileAttachment/Sample.txt, a link to the text file.
- To reference an attachment located in another topic, enter:
-
%PUBURLPATH%/%WEB%/OtherTopic/Sample.txt (if it's within the same web)
-
%PUBURLPATH%/Otherweb/OtherTopic/Sample.txt (if it's in a different web)
- Attached HTML files and text files can be inlined in a topic. Example:
-
Attach file: Sample.txt
-
Edit topic and write text: %INCLUDE{"%ATTACHURL%/Sample.txt"}%
- Content of attached file is shown inlined.
- Read more about INCLUDE in TWikiVariables
- GIF, JPG and PNG images can be attached and shown embedded in a topic. Example:
-
Attach file: Smile.gif
-
Edit topic and write text: %ATTACHURL%/Smile.gif
-
Preview: text appears as /twiki/pub/TWiki/FileAttachment/Smile.gif, an image.
File Attachment Contents Table
Files attached to a topic are displayed in a directory table, displayed at the bottom of the page, or optionally, hidden and accessed when you click Attach.
<--//twikiAttachments-->
File Attachment Controls
Clicking on a Manage link takes you to a new page that looks a bit like this (depending on what skin is selected):
<-- /twikiFormSteps-->
<--/patternTopicActions-->
- The first table is a list of all attachments, including their attributes. An
h means the attachment is hidden, it isn't listed when viewing a topic.
- The second table is all the versions of the attachment. Click on View to see that version. If it's the most recent version, you'll be taken to an URL that always displays the latest version, which is usually what you want.
- To change the comment on an attachment, enter a new comment and then click Change properties. Note that the comment listed against the specific version will not change, however the comment displayed when viewing the topic does change.
- To hide/unhide an attachment, enable the
Hide file checkbox, then click Change properties.
File names
File systems tend to be liberal about characters used in file names.
But there are characters which may cause problems if they are used in a file name of a TWiki attachment.
As such, when TWiki saves an uploaded file attachment, it's saved as a file whose name is cleansed to avoid problems.
Specifically:
- Space are replaed by underscores
- The
.txt extension is appended to some filenames for security reasons
- Characters such as
~, $, @, % are removed
- Non-ASCII characters are kept as they are
When an attachment file name is altered by the process above, you are notified
Known Issues
- Unlike topics, attachments are not locked during editing. As a workaround, you can change the comment to indicate an attachment file is being worked on - the comment on the specific version isn't lost, it's there when you list all versions of the attachment.
- Attachments are not secured by default. Anyone can read them if they know the name of the web, topic and attachment. Ask your TWiki administrator if TWiki is configured to secure attachments.
|
| |
Managing Topics
Browser-based rename, move, and delete for individual topics
Overview
You can use browser-based controls to change a topic's name, move it to another TWiki web, or delete it to a hidden Trash web.
How to Rename/Move/Delete a Topic
- Click on
[More topic actions] (bottom right of page) on the topic to be changed, then, in the new screen, on [Delete topic] or [Rename/move topic]. You can now rename and/or move/delete in one operation:
- To web: Select the target web if other than the current web.
- To topic: Enter the new topic name - default is current name
NOTE: You'll be warned if any of the topics to be affected are locked (being edited), or if there is a name conflict.
- Update links: Prevent updates by unchecking individual items on the list of referring links - these topics will NOT to be updated with the new name (by default, all referring links will be updated).
- Click on
[Rename/Move]: the topic will be renamed and links to the topic updated as requested.
- If any of the referring pages are locked then they will be listed: you can correct these later by again pressing
[Rename/Move].
- There is a Put back feature that allows you to undo a
Rename/Move/Delete - an instruction line and undo link will appear at the bottom of the modified topic. This allows you to revert from the last modification only.
Deleted Topics: How to Clear the Trash
Deleted topics are moved to a special Trash web - they are NOT physically erased from the server. All webs share Trash - in case of a name conflict with a topic already Trash, the user is alerted and asked to choose a new name.
The Trash web should be be cleared periodically, by archiving (saving) the text and RCS files if required (recommended), then deleting them from the Trash directory.
- This can only be done from on the server, not through the browser.
- Since simple FTP access to the
Trash directory is all that's required for maintenance, it's possible to grant Trash admin privileges to multiple users, while strictly limiting server access.
Redirecting from an Old Topic
You can use TWikiMetaData to place a command in the WebTopicViewTemplate and WebTopicNonWikiTemplate that will indicate that a topic has been moved by searching for %META:TOPICMOVED{...}%. Customize something like this:
%METASEARCH{type="topicmoved" web="%WEB%" topic="%TOPIC%"
title="This topic used to exist and was moved to: "}%
Note: Do not modify the TWiki.WebTopicViewTemplate - modifications would be lost on the next TWiki upgrade. Instead, create a WebTopicViewTemplate in the Main web with the same content and modify it to your needs.
How Rename/Move Works
-
%SEARCH%, with a special template, finds and displays all occurrences of the topic name in other topics, site-wide. These referring links are by default automatically changed to the new topic and/or web name. This includes relevant TWikiMetaData definitions.
- User can omit one or more topics from the update list by unchecking them.
-
<pre> and <verbatim> are honored - no changes are made to text within these areas.
- The topic is moved (if locks allow).
- References are changed (locks and permissions permitting).
- Any referring topics that can't be changed due to locks are listed - user can take note and change them at another time.
How Referring Topics Are Found
First, matching topics in the current web are listed - matches are to topic. Next, all webs (including the current one) are listed that match web.topic. All webs will be searched during rename, even if NOSEARCHALL is defined on a web, though access permissions will of course be honored.
Changed references are kept are as short as possible, ex: topic is used in preference to web.topic.
Effect of User Access Settings
User permissions affect the 'rename' functions in various ways. To rename a topic, you need all of VIEW, CHANGE and RENAME access to that topic. To alter referring topics, you need CHANGE access. See TWikiAccessControl for information on setting up access permissions.
Special Considerations
Consider carefully whether to make browser-based Rename/Move/Delete widely available, or to restrict it to an administrator/moderator group. Allowing all users to easily manipulate topics can be extremely useful in refactoring a busy web or site. However, there are at least two significant potential drawbacks to take into account:
- When referring links are updated, the modified topics appear in WebChanges, creating the impression that editorial changes were made. This can undermine the usefulness of WebChanges.
- Due to current limitations, fairly heavy use of Rename/Move/Delete functions can lead to an accumulation of minor technical problems (ex: broken links) and usability issues (ex: user confusion). If Rename... is used heavily, these negatives will obviously increase, in number and effect.
Ultimately, the size, objectives, and policies of your TWiki site, the real-world behavior of your user group, and most importantly, the initial TWiki site management leadership, will determine the most effective implementation of this feature, and the success of the site overall.
Known Issues
Rename/Move is fairly complicated due to the dynamic generation of links. Ideally, it would be possible to run the required part of rendering in a way that would allow identification of the text to be changed. Unfortunately, these hooks don't exist in TWiki at present. Instead, %SEARCH% is used with a special template to show the text to be changed, and the selected topics are then altered. One drawback is that search can show matches that will not be updated due to case differences. Other mismatches with actual rendered output are also possible as the approaches are so different.
The following shows some limitations of square bracket processing.
[[Old Topic]]  => [[NewTopic][Old Topic]]
[[old topic]]  => [[NewTopic][old topic]]
[[old t opic]] => not changed
[[OldTopic]]   => [[NewTopic]]
Related Topics: UserDocumentationCategory, AdminDocumentationCategory |
| |
Warning: Can't find topic TWiki.AppendixFileSystem
|
|
>
> |
TWiki Meta Data
Additional topic data, program-generated or from TWikiForms, is stored embedded in the topic text using META: tags
Overview
By default, TWiki stores topics in files on disk, in a really simple and obvious directory structure. The big advantage of this approach is that it makes it really easy to manipulate topics from outside TWiki, and is also very safe; there are no complex binary indexes to maintain, and moving a topic from one TWiki to another is as simple as copying a couple of text files.
To keep everything together in one place, TWiki uses a simple method for embedding additional data (program-generated or from TWikiForms) in topics. It does this using META: tags.
META: data includes program-generated info like FileAttachment and topic movement data, and user-defined TWikiForms info.
Meta Data Syntax
- Format is the same as in TWikiVariables, except all fields have a key.
-
%META:<type>{key1="value1" key2="value2" ...}%
- Order of fields within the meta variables is not defined, except that if there is a field with key
name, this appears first for easier searching (note the order of the variables themselves is defined).
- Each meta variable is on one line.
- Values in meta-data are URL encoded so that characters such as \n can be stored.
Example of Format
%META:TOPICINFO{version="1.6" date="976762663" author="LastEditorWikiName" format="1.0"}%
   text of the topic
%META:TOPICMOVED{from="Codev.OldName" to="Codev.NewName"
   by="TopicMoverWikiName" date="976762680"}%
%META:TOPICPARENT{name="NavigationByTopicContext"}%
%META:FILEATTACHMENT{name="Sample.txt" version="1.3" ... }%
%META:FILEATTACHMENT{name="Smile.gif" version="1.1" ... }%
%META:FORM{name="WebFormTemplate"}%
%META:FIELD{name="OperatingSystem" value="OsWin"}%
%META:FIELD{name="TopicClassification" value="PublicFAQ"}%
Meta Data Specifications
The current version of Meta Data is 1.0, with support for the following variables.
META:TOPICINFO
| Key |
Comment |
| version |
Same as RCS version |
| date |
integer, unix time, seconds since start 1970 |
| author |
last to change topic, is the REMOTE_USER |
| format |
Format of this topic, will be used for automatic format conversion |
META:TOPICMOVED
This is optional, exists if topic has ever been moved. If a topic is moved more than once, only the most recent META:TOPICMOVED meta variable exists in the topic, older ones are to be found in the rcs history.
%META:TOPICMOVED{from="Codev.OldName" to="Codev.NewName" by="talintj" date="976762680"}%
| Key |
Comment |
| from |
Full name, i.e., web.topic |
| to |
Full name, i.e., web.topic |
| by |
Who did it, is the REMOTE_USER, not WikiName |
| date |
integer, unix time, seconds since start 1970 |
Notes:
- at present version number is not supported directly, it can be inferred from the RCS history.
- there is only one META:TOPICMOVED in a topic, older move information can be found in the RCS history.
META:TOPICPARENT
| Key |
Comment |
| name |
The topic from which this was created, typically when clicking on a red-link, or by filling out a form. Normally just TopicName, but it can be a full Web.TopicName format if the parent is in a different Web. |
META:FILEATTACHMENT
| Key |
Comment |
| name |
Name of file, no path. Must be unique within topic |
| version |
Same as RCS revision |
| path |
Full path file was loaded from |
| size |
In bytes |
| date |
integer, unix time, seconds since start 1970 |
| user |
the REMOTE_USER, not WikiName |
| comment |
As supplied when file uploaded |
| attr |
h if hidden, optional |
Extra fields that are added if an attachment is moved:
| Key |
Comment |
| movedfrom |
full topic name - web.topic |
| movedby |
the REMOTE_USER, not WikiName |
| movedto |
full topic name - web.topic |
| moveddate |
integer, unix time, seconds since start 1970 |
META:FORM
| Key |
Comment |
| name |
A topic name - the topic represents one of the TWikiForms. Can optionally include the web name (i.e., web.topic), but doesn't normally |
META:FIELD
Should only be present if there is a META:FORM entry. Note that this data is used when viewing a topic, the form template definition is not read.
| Key |
Name |
| name |
Ties to entry in TWikiForms template, is title with all bar alphanumerics and . removed |
| title |
Full text from TWikiForms template |
| value |
Value user has supplied via form |
Recommended Sequence
There is no absolute need for Meta Data variables to be listed in a specific order within a topic, but it makes sense to do so a couple of good reasons:
- form fields remain in the order they are defined
- the
diff function output appears in a logical order
The recommended sequence is:
-
META:TOPICINFO
-
META:TOPICPARENT (optional)
- text of topic
-
META:TOPICMOVED (optional)
-
META:FILEATTACHMENT (0 or more entries)
-
META:FORM (optional)
-
META:FIELD (0 or more entries; FORM required)
Viewing Meta Data in Page Source
When viewing a topic the Raw Text link can be clicked to show the text of a topic (i.e., as seen when editing). This is done by adding raw=on to URL. raw=debug shows the meta data as well as the topic data, ex: debug view for this topic
Rendering Meta Data
Meta Data is rendered with the %META% variable. This is mostly used in the view, preview and edit scripts.
You can render form fields in topic text by using the FORMFIELD variable. Example:
%FORMFIELD{"TopicClassification"}%
For details, see VarFORMFIELD.
Current support covers:
| Variable usage: |
Comment: |
%META{"form"}% |
Show form data, see TWikiForms. |
%META{"formfield"}% |
Show form field value. Parameter: name="field_name". Example:
%META{ "formfield" name="TopicClassification" }% |
%META{"attachments"}% |
Show attachments, except for hidden ones. Options:
all="on": Show all attachments, including hidden ones. |
%META{"moved"}% |
Details of any topic moves. |
%META{"parent"}% |
Show topic parent. Options:
dontrecurse="on": By default recurses up tree, at some cost.
nowebhome="on": Suppress WebHome.
prefix="...": Prefix for parents, only if there are parents, default "".
suffix="...": Suffix, only appears if there are parents, default "".
separator="...": Separator between parents, default is " > ". |
Note: SEARCH can also be used to render meta data, see examples in FormattedSearch and SearchPatternCookbook.
Related Topics: DeveloperDocumentationCategory, UserDocumentationCategory
TWiki Text Formatting
These instructions are for contributors who prefer to use the Raw Edit over the default WYSIWYG editor. Working in TWiki is as easy as typing in text. You don't need to know HTML, though you can use it if you prefer. Links to topics are created automatically when you enter WikiWords. And TWiki shorthand gives you all the power of HTML with a simple coding system that takes no time to learn. It's all laid out below.
TWiki Editing Shorthand
|
Formatting Command:
|
You write:
|
You get:
|
Paragraphs:
Blank lines will create new paragraphs.
|
1st paragraph

2nd paragraph
|
<-- TWikibugs:Item7687 -->
1st paragraph
2nd paragraph
|
Headings:
Three or more dashes at the beginning of a line, followed by plus signs and the heading text. One plus creates a top level heading, two pluses a second level heading, etc. The maximum heading depth is 6.
You can create a table of contents with the %TOC% variable.
If you want to exclude a heading from the TOC, put !! after the ---+.
Empty headings are allowed and won't appear in the table of contents.
|
---++ Sushi
---+++ Maguro
---+++!! Not in TOC
|
Sushi
Maguro
Not in TOC
|
Bold Text:
Words get shown in bold by enclosing them in * asterisks.
|
*Bold*
|
Bold
|
Italic Text:
Words get shown in italic by enclosing them in _ underscores.
|
_Italic_
|
Italic
|
Bold Italic:
Words get shown in bold italic by enclosing them in __ double-underscores.
|
__Bold italic__
|
Bold italic
|
Fixed Font:
Words get shown in fixed font by enclosing them in = equal signs.
|
=Fixed font=
|
Fixed font
|
Bold Fixed Font:
Words get shown in bold fixed font by enclosing them in |
==Bold fixed==
|
Bold fixed
|
You can follow the closing bold, italic, or other (* _ __ = ==) indicator
with normal punctuation, such as commas and full stops.
Make sure there is no space between the text and the indicators.
All words enclosed by the indicators need to be on the same line.
|
_This works_,
_this does not _
_this fails
too_
|
This works,
_this does not _
_this fails
too_
|
Separator (Horizontal Rule):
Three or more three dashes at the beginning of a line..
|
-------
|
|
Bulleted List:
Multiple of three spaces, an asterisk, and another space.
For all the list types, you can break a list item over several lines by indenting lines after the first one by at least 3 spaces.
|
   * level 1
      * level 2
   * back on 1
   * A bullet
     broken over
     three lines
   * last bullet
|
- level 1
- back on 1
- A bullet broken over three lines
- last bullet
|
Icon List:
Multiple of three spaces, an asterisk, text icon:name and another space.
Use the name of any TWikiDocGraphics icon.
|
   * icon:tip Icon list
      * icon:led-red Full
      * icon:led-green OK
   * icon:unchecked Item 1
   * icon:checked Item 2
   * icon:empty No bullet
|
- Icon list
- Item 1
- Item 2
- No bullet
|
Numbered List:
Multiple of three spaces, a type character, a dot, and another space. Several types are available besides a number:
| Type |
Generated Style |
Sample Sequence |
| 1. |
Arabic numerals |
1, 2, 3, 4... |
| A. |
Uppercase letters |
A, B, C, D... |
| a. |
Lowercase letters |
a, b, c, d... |
| I. |
Uppercase Roman Numerals |
I, II, III, IV... |
| i. |
Lowercase Roman Numerals |
i, ii, iii, iv... |
|
   1. Sushi
   1. Dim Sum
   1. Fondue

   A. Sushi
   A. Dim Sum
   A. Fondue

   i. Sushi
   i. Dim Sum
   i. Fondue
|
- Sushi
- Dim Sum
- Fondue
- Sushi
- Dim Sum
- Fondue
- Sushi
- Dim Sum
- Fondue
|
Definition List:
Three spaces, a dollar sign, the term, a colon, a space, followed by the definition.
Deprecated syntax: Three spaces, the term with no spaces, a colon, a space, followed by the definition.
|
   $ Sushi: Japan
   $ Dim Sum: S.F.
|
- Sushi
- Japan
- Dim Sum
- S.F.
|
Table:
Each row of the table is a line containing of one or more cells. Each cell starts and ends with a vertical bar '|'. Any spaces at the beginning of a line are ignored.
-
| *bold* | header cell with text in asterisks
-
| center-aligned | cell with at least two, and equal number of spaces on either side
-
| right-aligned | cell with more spaces on the left
-
| 2 colspan || and multi-span columns with multiple |'s right next to each other
-
|^| cell with caret indicating follow-up row of multi-span rows
-
|>> ... <<| cell enclosed in double-square brackets can span multiple lines - useful for bullets and nested tables
- You can split rows over multiple lines by putting a backslash
'\' at the end of each line
- Contents of table cells wrap automatically as determined by the browser
- Use
%VBAR% or | to add | characters in tables.
- Use
%CARET% or ^ to add ^ characters in tables.
The TablePlugin provides the |^| multiple-span row functionality, |>> ... <<| multi-line syntax, and additional rendering features
|
| *L* | *C* | *R* |
| A2 |  B2  |  C2 |
| A3 |  B3  |  C3 |
| multi span |||
| A5-7 |  5  |  5 |
|^| six | six |
|^| seven | seven |
| split\
  | over\
  | 3 lines |
| A9 |>>
 | Nested |
 | table |
<<|  C9 |
|
| L |
C |
R |
| A2 |
B2 |
C2 |
| A3 |
B3 |
C3 |
| multi span |
| A5-7 |
5 |
5 |
| six |
six |
| seven |
seven |
| split |
over |
3 lines |
| A9 |
|
C9 |
|
WikiWord Links:
CapitalizedWordsStuckTogether (or WikiWords) will produce a link automatically if preceded by whitespace or parenthesis.
If you want to link to a topic in a different web write Otherweb.TopicName.
To link to a topic in a subweb write Otherweb.Subweb.TopicName.
The link label excludes the name of the web, e.g. only the topic name is shown. As an exception, the name of the web is shown for the WebHome topic.
Dots '.' are used to separate webs and subwebs from topic names and therefore cannot be used in topic names.
It's generally a good idea to use the TWikiVariables %SYSTEMWEB% and %USERSWEB% instead of TWiki and Main.
|
WebStatistics

Sandbox.WebNotify

Sandbox.WebHome

Sandbox.Subweb.TopicName
|
WebStatistics
WebNotify
Sandbox
TopicName
|
Anchors:
You can define a reference inside a TWiki topic (called an anchor name) and link to that. To define an anchor write #AnchorName at the beginning of a line. The anchor name must be a WikiWord of no more than 32 characters. To link to an anchor name use the [[MyTopic#MyAnchor]] syntax. You can omit the topic name if you want to link within the same topic.
|
[[WikiWord#NotThere]]

[[#MyAnchor][Jump]]

#MyAnchor
To here
|
WikiWord#NotThere
Jump
To here
|
External Links:
URLs starting with file, ftp, gopher, http, https, irc, mailto, news, nntp and telnet are linked automatically if preceded by whitespace or parenthesis. External links are indicated with a trailing icon, and open up in a new browser tab or window; the behavior of both can be set in configure or preferences variables (see TWikiExternalLinks for details). Links can be prevented with an ! exclamation point prefix.
|
http://twiki.org

https://google.com

!http://escaped-link
|
http://twiki.org
https://google.com
http://escaped-link
|
Forced Links:
Use double square brackets to create forced links: Write [[link]] or [[link][label]] to force a link. Use the former for singleton words and if automatic linking is disabled. Use the latter one to specify a link label other than the link. For the link, you can use internal link references (e.g. WikiWords) and URLs (e.g. http://TWiki.org/).
URL parameters can follow a WikiWord
Anchor names can be added to create a link to a specific place in a document.
To "escape" double square brackets that would otherwise make a link, prefix the leading left square bracket with an exclamation point.
The topic title instead of the topic name is shown for [[WikiWord]] links if the SHOWTOPICTITLELINK preferences setting is enabled.
|
[[WikiWord]]

[[WikiWord?n1=v1;n2=v2]]

[[WikiWord#TheAnchor]]

[[WikiWord?n=5#TheAnchor]]

[[WikiSyntax][wiki syntax]]

[[http://gnu.org/][GNU]]

[[Singleton]]

escaped:
![[WikiSyntax]]
|
WikiWord
WikiWord?n1=v1;n2=v2
WikiWord#TheAnchor
WikiWord?n=5#TheAnchor
wiki syntax
GNU
Singleton
escaped:
[[WikiSyntax]]
|
Topic Title Links:
Use double square brackets and a plus sign to create links with topic title: Write [[+TopicName]] or [[+Web.TopicName]] to show the topic title instead of the topic name. The topic title is defined by the form field named "Title", the topic preferences setting named TITLE, or the topic name if neither exists.
An alternative syntax is [[TopicName][$topictitle]] or [[Web.TopicName][$topictitle]].
|
[[+BugN1234]]

[[+Bugs.BugN1234]]

[[BugN1234][$topictitle]]
|
The sky is falling
The sky is falling
The sky is falling
|
Prevent a Link:
Prevent a WikiWord from being linked by prepending it with an exclamation point.
|
!SunOS
|
SunOS
|
Disable Links:
You can disable automatic linking of WikiWords by surrounding text with <noautolink> and </noautolink> tags.
It is possible to turn off all auto-linking with a NOAUTOLINK preferences setting.
|
 <noautolink>
 RedHat & SuSE
 </noautolink>
|
RedHat & SuSE
|
Mailto Links:
E-mail addresses are linked automatically. To create e-mail links that have more descriptive link text, specify subject lines or message bodies, or omit the e-mail address, you can write [[mailto:user@domain][descriptive text]].
|
a@b.com

[[mailto:a@b.com]\
[Mail]]

[[mailto:?subject=\
Hi][Hi]]
|
a@b.com
Mail
Hi
|
Twitter Links:
@twitter IDs are linked automatically. The link rule is defined by the {Links}{TwitterUrlPattern} configure setting.
|
@twiki
|
@twiki
|
Verbatim Text:
Surround code excerpts and other formatted text with <verbatim> and </verbatim> tags.
The verbatim tag disables HTML code. Use <pre> and </pre> tags instead if you want the HTML code within the tags to be interpreted.
Preferences variables (* Set NAME = value) are set within verbatim tags.
|
<verbatim>
class CatAnimal {
  void purr() {
    <code here>
  }
}
</verbatim>
|
class CatAnimal {
  void purr() {
    <code here>
  }
}
|
Literal Text:
TWiki generates HTML code from TWiki shorthand.
Experts surround anything that must be output literally in the HTML code, without the application of
TWiki shorthand rules, with <literal>..</literal> tags.
Any HTML within literal tags must be well formed i.e. all tags must be properly closed before the end of the literal block.
TWiki Variables are expanded within literal blocks.
|
<literal>
| Not | A | Table |
<literal>
|
| Not | A | Table |
|
Protected Text:
Experts protect text from mangling by WYSIWYG editors using
<sticky>..</sticky> tags. Sticky tags don't have any effect on normal
topic display; they are only relevant when content has to be
protected from a WYSIWYG editor (usually because it isn't well-formed HTML, or because it
is HTML that WYSIWYG would normally filter out or modify). Protected
content appears as plain text in the WYSIWYG editor.
|
<sticky>
<div>
This div is required
</div>
</sticky>
|
This div is required
|
Using HTML, CSS and JavaScript
You can use most HTML tags in TWiki topics without a problem. This is useful where you want to add some content that is formatted in a way that is not supported using TWiki shorthand, for example, you can write <strike>deleted text</strike> to get deleted text.
There are a few usability and technical considerations to keep in mind:
- On collaboration pages, it's better not to use HTML, but to use TWiki shorthand instead - this keeps the text uncluttered and easy to edit using the plaintext editor.
- If you must use HTML, use XHTML 1.0 Transitional syntax.
- Use
<literal>..</literal> tags around blocks of HTML to avoid accidental interpretation of TWiki shorthand within the HTML.
- Script tags may be filtered out, at the discretion of your TWiki administrator.
Recommendations when pasting HTML from other sources (using the plain-text editor):
- Copy only text between
<body> and </body> tags.
- Remove all empty lines. TWiki inserts
<p /> paragraph tags on empty lines, which causes problems if done between HTML tags that do not allow paragraph tags, like for example between table tags.
- Remove leading spaces. TWiki might interpret some text as lists.
- Do not span a tag over more than one line. TWiki requires that the opening and closing angle brackets -
<...> - of a HTML tag are on the same line, or the tag will be broken.
- In your HTML editing program, save without hard line breaks on text wrap.
When using a WYSIWYG editor, you can just copy-paste directly into the editor, and the content will be converted to TWiki shorthand automatically when you save.
It is also possible to add Cascading Style Sheets (CSS) and JavaScript code to TWiki pages, which can be used to make TWiki application more interactive. To prevent TWiki from interpreting some text as markup, it can be enclosed in HTML-escaped <pre>-tags.
|
JavaScript Example:
|
CSS Example:
|
|---|
<!-- <pre> -->
<script language="javascript">
<!--
  // put your JavaScript code here
//-->
</script>
<!-- </pre> -->
|
<!-- <pre> -->
<style type="text/css">
  /* put your CSS code here */
</style>
<!-- </pre> -->
|
Hyperlinks
Being able to create links without any special formatting is a core TWiki feature, made possible with WikiWords and inline URLs.
Internal Links
- GoodStyle is a WikiWord that links to the GoodStyle topic located in the current web.
- NotExistingYet is a topic waiting to be written because it is a red-link. Create the topic by clicking on the link. (Try clicking, but then, Cancel - creating the topic would wreck this example!)
External Links
-
http://..., https://..., ftp://..., gopher://..., news://..., file://..., telnet://... and mailto:...@... are linked automatically.
- Write
[[URL][label]] to get an external link with a descriptive text for the link, such as [[http://google.com/][Google home page]] to get Google home page.
- E-mail addresses like
name@domain.com are linked automatically.
TWiki Variables
TWiki Variables are names enclosed in percent signs that are that are expanded to some other text when the topic is displayed. For example, %TOPIC% is expanded to TWikiVariablesQuickStart. Some variables can take arguments in curly braces - for example, %INCLUDE{"OtherTopic" arg="value"}%.
Many TWiki variables are built-in, and others are predefined for your convenience. TWikiVariables describes how you can also define your own TWiki Variables at the entire site, individual web, or individual topic level. Variables are fully expanded before any of the TWiki text formatting rules are applied.
Commonly used variables:
-
%TOC% : Automatically generates a table of contents based on headings in a topic - see the top of this page for an example.
-
%WEB% : The current web, is TWiki.
-
%TOPIC% : The current topic name, is TWikiVariablesQuickStart.
-
%ATTACHURL% : The attachment URL of the current topic. Example usage: If you attach a file to a topic you can refer to it as %ATTACHURL%/image.gif to show the URL of the file or the image in your text.
-
%INCLUDE{"SomeTopic"}% : Server side include, includes another topic. The current web is the default web. Example: %INCLUDE{"TWiki.SiteMap"}%
-
%SEARCH{"sushi"}% : Inline search showing the search result embedded in a topic. FormattedSearch gives you control over formatting, used to create web-based applications.
- Documentation Graphics: There are many graphics available to use in your topics. Use
%ICON{"help"}%, %ICON{"tip"}%, and %ICON{"warning"}% to get: , , and , respectively.
- Use the TWiki Variables Wizard to find and compose variables.
- See all TWiki Variables.
To "escape" a variable, prefix it with an exclamation mark. Write: !%SOMEVARIABLE% to get: %SOMEVARIABLE%.
TWikiPlugin Formatting Extensions
Plugins can extend the functionality of TWiki into many other areas. There are a huge number of TWiki plugins available from the Plugins web on TWiki.org.
Currently enabled plugins on this TWiki installation, as listed by %PLUGINDESCRIPTIONS%:
- SpreadSheetPlugin (2018-07-05, $Rev: 30478 (2018-07-16) $): Add spreadsheet calculation like
"$SUM( $ABOVE() )" to TWiki tables or anywhere in topic text - BackupRestorePlugin (2018-07-10, $Rev: 30551 (2018-07-16) $): Administrator utility to backup, restore and upgrade a TWiki site
- ColorPickerPlugin (2018-07-05, $Rev: 30442 (2018-07-16) $): Color picker, packaged for use in TWiki forms and TWiki applications
- CommentPlugin (2018-07-05, $Rev: 30530 (2018-07-16) $): Quickly post comments to a page without an edit/preview/save cycle
- DatePickerPlugin (2018-07-05, $Rev: 30446 (2018-07-16) $): Pop-up calendar with date picker, for use in TWiki forms, HTML forms and TWiki plugins
- EditTablePlugin (2018-07-05, $Rev: 30448 (2018-07-16) $): Edit TWiki tables using edit fields, date pickers and drop down boxes
- HeadlinesPlugin (2018-07-13, $Rev: 30560 (2018-07-16) $): Show headline news in TWiki pages based on RSS and ATOM news feeds from external sites
- InterwikiPlugin (2018-07-05, $Rev: 30454 (2018-07-16) $): Write
ExternalSite:Page to link to a page on an external site based on aliases defined in a rules topic - JQueryPlugin (2018-07-05, $Rev: 30456 (2018-07-16) $): jQuery JavaScript library for TWiki
- PreferencesPlugin (2018-07-05, $Rev: 30528 (2018-07-16) $): Allows editing of preferences using fields predefined in a form
- SetGetPlugin (2018-07-05, $Rev: 30472 (2018-07-16) $): Set and get variables and JSON objects in topics, optionally persistently across topic views
- SignaturePlugin: (disabled)
- SlideShowPlugin (2018-07-05, $Rev: 30474 (2018-07-16) $): Create web based presentations based on topics with headings.
- SmiliesPlugin (2018-07-05, $Rev: 30476 (2018-07-16) $): Render smilies as icons, like
:-) as  or or :eek: as  - TWikiNetSkinPlugin: (disabled)
- TWikiSheetPlugin (2018-07-15, $Rev: 30604 (2018-07-16) $): Add TWiki Sheet spreadsheet functionality to TWiki tables
- TablePlugin (2018-07-05, $Rev: 30480 (2018-07-16) $): Control attributes of tables and sorting of table columns
- TagMePlugin (2018-07-05, $Rev: 30482 (2018-07-16) $): Tag wiki content collectively or authoritatively to find content by keywords
- TinyMCEPlugin (2018-07-10, $Rev: 30541 (2018-07-16) $): Integration of the Tiny MCE WYSIWYG Editor
- TwistyPlugin (2018-07-06, $Rev: 30497 (2018-07-16) $): Twisty section JavaScript library to open/close content dynamically
- WatchlistPlugin (2018-07-10, $Rev: 30536 (2018-07-16) $): Watch topics of interest and get notified of changes by e-mail
- WysiwygPlugin (2018-07-06, $Rev: 30528 (2018-07-16) $): Translator framework for WYSIWYG editors
Check on current Plugin status and settings for this site in TWikiPreferences.
Common Editing Errors
TWiki formatting rules are fairly simple to use and quick to type. However, there are some things to watch out for, taken from the TextFormattingFAQ:
- Q: Text enclosed in angle brackets like
<filename> is not displayed. How can I show it as it is?
- A: The
'<' and '>' characters have a special meaning in HTML, they define HTML tags. You need to escape them, so write '<' instead of '<', and '>' instead of '>'.
Example: Type 'prog <filename>' to get 'prog <filename>'.
- Q: Why is the
'&' character sometimes not displayed?
- A: The
'&' character has a special meaning in HTML, it starts a so-called character entity, e.g. '©' is the © copyright character. You need to escape '&' to see it as it is, so write '&' instead of '&'.
Example: Type 'This & that' to get 'This & that'.
Related topics: WikiSyntax, WikiWord, WikiNotation, TextFormattingRules, TWikiEditingShorthand, TWikiRenderingShortcut, TWikiShorthand, TWikiVariablesQuickStart |